When adding pictures to PowerPoint slides you might come across images which don’t go with your background design. To make images fit in you might need to remove their background. Here is a quick tip about how to make images in PowerPoint transparent.
Method 1: Make Images Transparent using Transparent Color Option
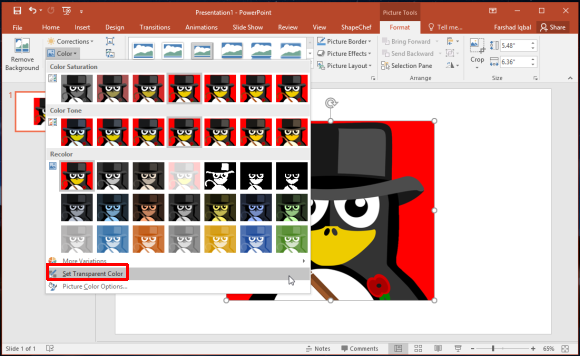
To get started, click on a picture and go to the Format tab in PowerPoint. You will be provided with a number of image editing options to format your picture. Go to the Color option and select Set Transparent Color.

In the next step, click on the image background to instantly make it transparent. You might end up with some fine edges that you can choose to keep or remove. You can make the edges more prominent by going to Format –> Picture Border.
Similarly, to remove the edges left over from the background there are a number of things you can do. You can select the image and select the background color via Picture Border to change the color of the frame. If you can’t find the color you’re looking for, Select Eyedropper via Picture Border and select the color from within your slide background. If you find this method cumbersome or find it difficult to remove edges using this method, you can use Method 2 given below.

Method 2: Remove Picture Background
You can also make your images transparent by selecting the image and going to Format –> Remove Background and select the area to remove or keep. This option has two main background removal options, you can either choose the areas to keep (Mark Areas to Keep) or the ones to remove (Mark Areas to Remove).

Once selected, click Keep Changes from the Ribbon menu to apply the changes. As you can see from the image below, we successfully remove the background of the image and made it transparent enough to gel with the default black background design.

There are many other ways by which you can make your images transparent, such as by editing the images using an image editor like PhotoShop or a web app like Clipping Magic for this purpose.


Leave a Reply